# Player Connect Wallet
{% hint style="warning" %}
First make sure to setup your [Prerequisites](https://cryptonauts.gitbook.io/cryptonauts-docs/setup) and understand the [UI/UX Overview](https://cryptonauts.gitbook.io/cryptonauts-docs/auth/ux).
{% endhint %}
To enable players to Connect their Stacks Wallet ([Leather](https://chromewebstore.google.com/detail/leather/ldinpeekobnhjjdofggfgjlcehhmanlj) or [Xverse](https://chromewebstore.google.com/detail/xverse-bitcoin-crypto-wal/idnnbdplmphpflfnlkomgpfbpcgelopg)) to your UE5 based game. \
\
We will start with a Custom Event handler for the On Click of our Connect Wallet button.
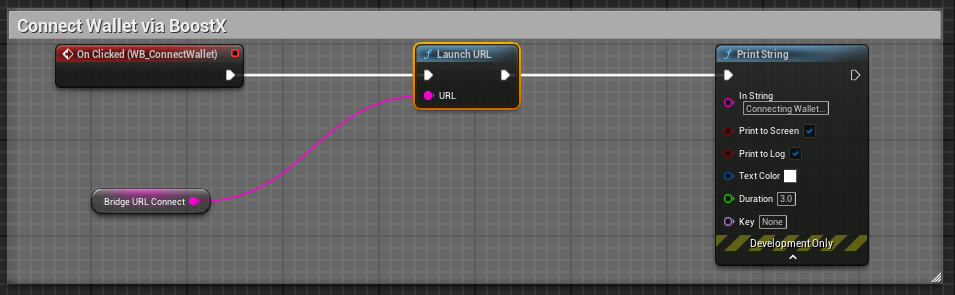
### "Connect" Clicked
The user clicks the "Connect Wallet" button, which is wired to a `Launch URL` node \
(eg upon click GET your Bridge app URL at something like, check out the [Prerequisites](https://cryptonauts.gitbook.io/cryptonauts-docs/setup) for more info regarding the Bridge app)
```
https://your.bridge.url/?payload=%7B%22request%22%3A%22connect%22%7D
```
Note: You can pass to a `Print String` node for debugging purposes.
### "Confirm" Clicked
**After the player clicks Confirm in their Wallet.**\
Your Bridge app will invoke the Authentication Response Call Back to your Game. \
Your Game client needs to be Listening for the Call Back, handling the Authentication Response.
{% hint style="warning" %}
Your Bridge App requires Your Game client to be running a Listening Server (via the BlueprintHttpServer plugin) in order to handle your players authentication response call backs.
{% endhint %}
Here you can see (top part of the screenshot) in our Event Graph of our `WB_MainMenu`, after our Main Menu is Constructed, we instantiate and set our `HTTP Server` as a variable (this is courtesy of the already installed [BlueprintHttpServer](https://www.fab.com/listings/8b0025e4-4a98-4461-977d-ebb645def4d7) plugin) and wire it to our two needed routes (`POST` and `OPTIONS`) and wired to our `Listen` node at `127.0.0.1:8080`\
\
During the Authentication Response handling, your game will first need to handle the preflight check. \
This is required and acts as a safety check.\
The preflight request for the http `OPTIONS` is handled by setting the `Headers` \
(variable type Map of Strings)
Next handle the `POST` where we can extract the users session details, such as the\
`userSession.loadUserData.profile.stxAddress.mainnet` from our body `payload`\
Storing and using the `mainnet` address as a game variable. \
(see [Player BNS](https://cryptonauts.gitbook.io/cryptonauts-docs/auth/bns) for more information regarding storing and making use of the players `mainnet` address)
{% hint style="info" %}
See the [Video Demo](https://cryptonauts.gitbook.io/cryptonauts-docs/auth/video-demo) for Example of the [Player UX ](https://cryptonauts.gitbook.io/cryptonauts-docs/auth/ux) for when the Player Connects their Wallet
{% endhint %}